Thera and Turnur Scanning Guide: Difference between revisions
Strelnikova (talk | contribs) |
Strelnikova (talk | contribs) |
||
| Line 131: | Line 131: | ||
=== Thera and Turnur Scanning Guide Checklist === | === Thera and Turnur Scanning Guide Checklist === | ||
<pre>< | <pre><p><strong>NOTE: This checklist does not replace reading the </strong><a href="https://wiki.signalcartel.space/Thera_and_Turnur_Scanning_Guide">wiki</a></p> | ||
<p><br></p> | |||
<p><strong>Thera and Turnur Scanning Checklist</strong></p> | |||
<p><br></p> | |||
<p>1. Preparation:</p> | |||
<p>Be in Thera or Turnur</p> | |||
<p>Online the shared in-game bookmark folders:</p> | |||
<p><code>Signal Cartel \\ Thera</code></p> | |||
<p><code>EVE-Scout \\ Thera</code></p> | |||
<p>Open the <a href="https://scan.eve-scout.com">Hub Scan Tool</a></p> | |||
<p>2. Import Signatures Tab: copy all of the signatures from your Probe Scanner window and paste them into the Tool</p> | |||
<p>3. Scan Signatures Tab: the Tool will populate a table that cross-references with Probe Scanner data</p> | |||
<p>4. Confirm that the expired signature ID is not listed</p> | |||
<p>5. Delete the expired signature by clicking the trash icon</p> | |||
<p>6. Scan Down the Cosmic Signature and Warp to the WH</p> | |||
<p>7. Enter the Outgoing Thera/Turnur-side WH Type (and eventually EOL state)</p> | |||
<p>8. Jump in the WH then enter the Incoming WH Type and Destination System</p> | |||
<p>9. Enter the Incoming WH Signature</p> | |||
<p>10. Create the Far System "In Bookmark"</p> | |||
<p>11. Create the Thera/Turnur-side "Out Bookmark"</p> | |||
<p>12. Add the New Signature in the Hub Scan Tool</p> | |||
<p>13. Double-Check Yourself</p></pre>--> | |||
Revision as of 10:55, 7 December 2023
| EvE-Scout Mapping |
|---|
|
Thera and Turnur Scanning |
|
Tools |
This is a beginner's Thera and Turnur Scanning Guide intended to explain how to keep our EvE-Scout Hub Connections up-to-date using the Hub Scan Tool. The primary audience is newer scouts who are not experienced with the process. Each scout has their own method, and what works for a very experienced scout will probably not work for a less experienced pilot.
Overview
- Join the in-game
EvE-Scout.TheraMapchat channel. This channel is for Thera and Turnur mapping endeavor communications. - Log in your pilot Hub Scan Tool.
- Use the Hub Scan Tool to check the status of signatures in Thera or Turnur.
- Clear any expired signatures in the Hub Scan Tool.
- Map any new signatures: add them to Hub Scan Tool and save the bookmarks to the in-game
Signal Cartel \\ Therafolder.
- Have questions? Ask away in the
#mapping-loungeDiscord channel or in-gameEvE-Scout.TheraMapintel channel. - After you have added 5 or more Thera or Turnur Wormhole Connections to the EvE-Scout Hub Connections website, claim your free fitted covert ops ship by clicking here! Program is courtesy of Tekufah.
Tools of the Trade
Hub Scan Tool
- The Hub Scan Tool is a web-based program that helps to co-ordinate, simplify and speed up the process of scanning and recording Thera and Turnur signatures, while reducing typing errors. The tool makes it quick to see what signatures are expired or new, co-ordinates work between pilots, and maintains the list of signatures published on our public EvE-Scout Hub Connections page.
- These tools were created as a gift to Signal Cartel by the Engineering Team:
Thera and Turnur Scanning Instructions
Preparation
- Be in Thera or Turnur, undocked, and preferably cloaked at a safe in the scanning ship of your choice.
- Join the
EvE-Scout.TheraMapchat channel. - Online the shared in-game bookmark folders:
Signal Cartel \\ Thera: this is our private folder. Put your bookmarks here!EVE-Scout \\ Thera: this is our public folder. Only Bookmark Managers have write permission.- Links are given in the Alliance and Intel Channel chat MOTDs.
- Open the Hub Scan Tool and log in your pilot.
- Check the Thera/Turnur slider is set correctly:

Assess the Status of the Current Thera or Turnur Map Using the Hub Scan Tool
Import the current lists of Thera/Turnur signatures from your Probe Scanner window into the Hub Scan Tool. See the instructions in the tool for more information.
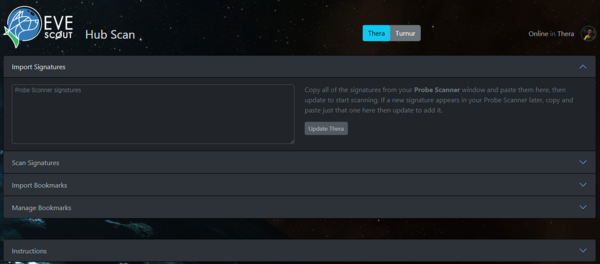
Import Signatures Tab
- Copy all of the signatures from your Probe Scanner window and paste them here (Ctrl-A, Ctrl-C, Ctrl-V), then update Thera or Turnur to start mapping. If a new signature appears in your Probe Scanner later, copy and paste just that one into the import tab then update to add it.

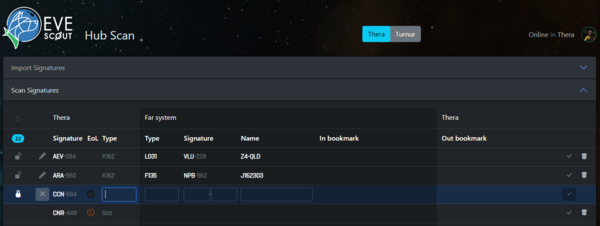
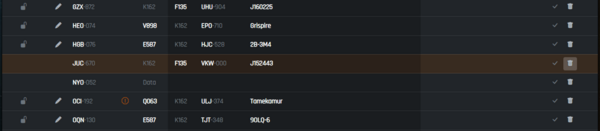
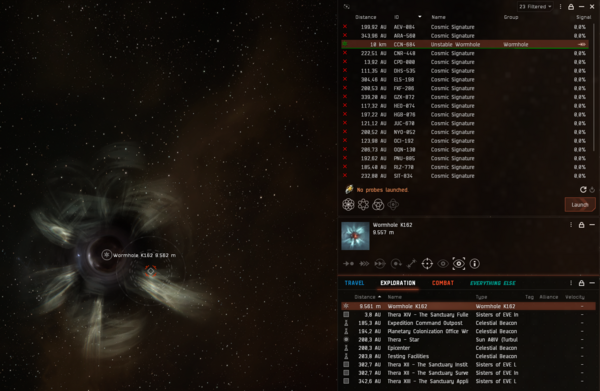
Scan Signatures Tab
- The "Scan Signatures" tab in the Hub Scan Tool will populate a table that cross-references with Probe Scanner data
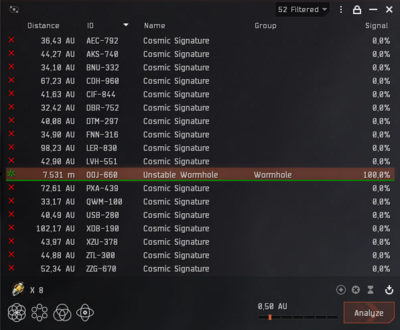
- Expired signatures are highlighted in orange,
- New signatures are highlighted in blue:


Clear the Expired Signatures
While it may seem counterintuitive at first, clearing expired signatures (highlighted in orange) should be prioritized over mapping new signatures. This is because capsuleers will plan their routes based on potentially dated information and non-existent wormhole connections. So clear those expired sigs!
Confirm the Signature is Expired In-game
- Open the in-game Probe Scanner window and confirm that the expired signature ID is not listed.
Delete the Expired Signature from Hub Scan Tool
- By selecting trash icon:
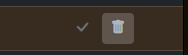

- The new tool will update almost instantly for all users.
Map the New Signatures
New signatures need to be scanned down, mapped, and then added to Hub Scan Tool. Using the Tool to help manage your workflow, you will work from left to right for each New Signature highlighted in blue on the "Scan Signatures" table.
- By clicking on the pen icon you automatically claim the signature (if another mapper will try to click on the sig you're working on, an alert will pop up on their Tool denoting the sig has been claimed by your pilot).
Scan Down the Cosmic Signature
- Scan down the signature and assuming it's a wormhole, you're in business!
- If it's a data, relic or gas site enter its type in the Tool, save it, and move on to the next signature.
NOTE: Teaching proper scanning techniques is beyond the scope of this guide. To learn more about scanning down Cosmic Signatures please see our Explorer's Handbook Scanning page.
Map the Signature
You will use the Hub Scan Tool to expedite your workflow moving from left to right along the row.
Enter the Outgoing Thera/Turnur-side Wormhole Type
- Warp to the wormhole.
- Once you are on grid with the wormhole, look for it's type on your in-game Overview. If it's not 'K162' (the default exit type), enter it into the Type column of the Hub Scan Tool.

- Also, right click on the wormhole and select the "Show Info" option to discover if the wormhole's lifetime is end-of-life or if its mass is destabilized or critical. Fill the dedicated tick in Hub Scan Tool if WH is EOL (end of life).
- Once you are on grid with the wormhole, look for it's type on your in-game Overview. If it's not 'K162' (the default exit type), enter it into the Type column of the Hub Scan Tool.


Enter the Incoming Wormhole Type and Destination System
- Jump through the wormhole (assuming it's safe).
- Enter the incoming wormhole's type (if it's k162, it will be auto-populated).
- Confirm the far system's name into the Hub Scan Tool (it will auto-detect via the ESI):


Enter the Incoming Wormhole Signature
- Enter the incoming wormhole's signature in the Far System's Signature ID into the Hub Scan Tool.
- If there are multiple Cosmic Signatures in the far system, you will have to scan down which one you came in through.
- Orbit the wormhole at 4000m.
- Launch your probes, cloak, click the "Center current formation on your ship" icon at 1 AU and you should be able to resolve the wormhole ID that you just came through.
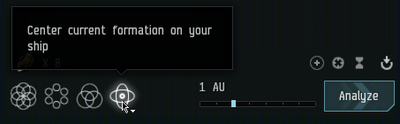
- Highlight the signature in the Probe Scanner window, copy it (Ctrl-C), and then paste it (Ctrl-V) into the "Far System's Signature ID" field in the Hub Scan Tool.


- You've just mapped your first signature! Now, let's create some bookmarks to help share it with all of New Eden.
Create the Far System "In Bookmark"
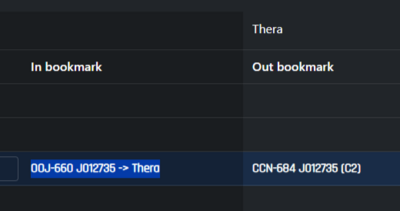
Once all the fields in the Hub Scan Tool are filled in for the New Signature, "In bookmark" and "Out bookmark" labels will be generated by the tool.![]()
![]()
- Click the "In bookmark" label to copy it to your clipboard.
- Right-click on the wormhole from your in-game Overview to save its exact location (this is important!).
- Select 'Save Location...':
- Select 'Save Location...':

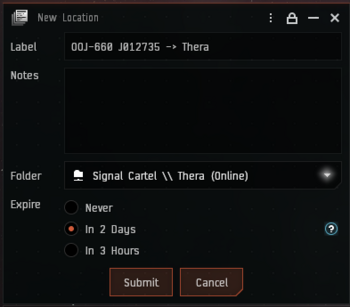
- A "New Location" window for your in-game bookmark will pop up:
- Paste the "In Bookmark" into the Label field (Ctrl-V).
- Make sure the folder is set to: Signal Cartel \\ Thera.
- Set the Expire time to "Never" (2 days is also okay).
- Click the "Submit" button.
Create the Thera/Turnur-side "Out Bookmark"
- Jump back through the wormhole to Thera or Turnur.
- In the Hub Scan Tool, click the "Out bookmark" label to copy it to your clipboard.
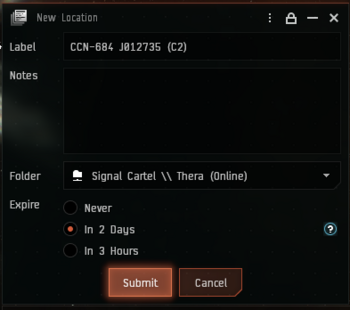
- Repeat the exact same steps as above to bookmark the Thera/Turnur-side of the wormhole.
- Remember to right-click on the wormhole from your in-game Overview to save its exact location (this is important!).
- It should look like this:

Add the New Signature in the Hub Scan Tool
- Add the new signature to HST by clicking the tick on the rightmost column of the "Scan Signatures" table in the Hub Scan Tool.
- This will automatically update Hub Scan Tool data into our EvE-Scout Hub Connections.
Double-Check Yourself and Then Admire Your Work
- After submitting your signatures, always double-check yourself:
- Check your bookmarks using the Hub Scan Tool
- Check EvE-Scout Hub Connections to make sure your sigs were properly pushed to the website. Note: There may be a delay of up to 10 minutes before the sig shows on the website.
- If everything is ok, please take a moment to bask in the glow of a job well done. Congrats! Now get on with the next sig because Thera and Turnur are ever-changing and mysterious places that you are now a part of!
Feedback
Comments, suggestions and questions are always welcome. Please post them here:
#mapping-loungeDiscord channelEvE-Scout.TheraMapIn-game Hub Mapping Intel Channel
Scanning Guide In-Game Notepad checklists WORK IN PROGRESS
Notes to copy and paste into in-game notepad.
These notes are not automatically updated in-game. Please make sure you're always using the latest version
Thera and Turnur Scanning Guide Checklist
<p><strong>NOTE: This checklist does not replace reading the </strong><a href="https://wiki.signalcartel.space/Thera_and_Turnur_Scanning_Guide">wiki</a></p>
<p><br></p>
<p><strong>Thera and Turnur Scanning Checklist</strong></p>
<p><br></p>
<p>1. Preparation:</p>
<p>Be in Thera or Turnur</p>
<p>Online the shared in-game bookmark folders:</p>
<p><code>Signal Cartel \\ Thera</code></p>
<p><code>EVE-Scout \\ Thera</code></p>
<p>Open the <a href="https://scan.eve-scout.com">Hub Scan Tool</a></p>
<p>2. Import Signatures Tab: copy all of the signatures from your Probe Scanner window and paste them into the Tool</p>
<p>3. Scan Signatures Tab: the Tool will populate a table that cross-references with Probe Scanner data</p>
<p>4. Confirm that the expired signature ID is not listed</p>
<p>5. Delete the expired signature by clicking the trash icon</p>
<p>6. Scan Down the Cosmic Signature and Warp to the WH</p>
<p>7. Enter the Outgoing Thera/Turnur-side WH Type (and eventually EOL state)</p>
<p>8. Jump in the WH then enter the Incoming WH Type and Destination System</p>
<p>9. Enter the Incoming WH Signature</p>
<p>10. Create the Far System "In Bookmark"</p>
<p>11. Create the Thera/Turnur-side "Out Bookmark"</p>
<p>12. Add the New Signature in the Hub Scan Tool</p>
<p>13. Double-Check Yourself</p>
-->