Directional Scanner and Overview
| The Explorer's Handbook |
|---|
Introduction[edit]
For the new player, operation of all of the tools available to the pilot may be a bit daunting. There are however two parts of the Eve user interface that deserve a bit of in depth "exploration": The D-Scan or directional scanner and the Overview Window. These two are both customizable for whatever profession(s) you choose. While this guide will focus on uses during exploration, a little experimentation will go a long way to understanding all of the capabilities that these two versatile tools have to offer. There are many tutorials available on the web, but this one will focus on getting you started, familiarizing you with some of the controls, providing you with some options for configuration, some exercises you can do to practice and something new you can try out.
Grab your frigate, go to a safe place in a high security system and let's take a look at these tools.
Screen Layout[edit]
You will need to figure out for yourself what layout of your controls and game windows works best for you. This is a highly individualized thing, and it depends if you are using one or more screens. Also, what works for exploring may be useless if you are also going to do other things. It seems that the D-Scan and Overview is the same for all characters in an Eve account. It's all about what works for YOU.
If you are still at the stage where you are trying to determine where everything should be on your screen, one preference is to have most of the essential informational windows on the right side of the screen. Please see image below.
-
One possible screen layout.
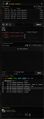
Starting on the top is the probe results window (unlocked from the map). Just below it is the local chat window so that you always know how many other pilots are in the same system. Generally, the more pilots there are, the riskier. Of course, in wormhole space (also called J-space) you never know for sure. Below that is the D-Scan results window (also unlocked from the map). Below that is the overview window and finally, at the very bottom is the selected item window.
Take a moment now to arrange your window controls to your own preference. As an explorer, your probe scanner, d-scanner and overview windows will be used very frequently, and it makes sense to have them visible at all times. Of note, the Local Chat window does not need to be very big. You can configure it (the gear in the upper left corner and the icon immediately next to it) to list names without pictures. Corp chat can be kept separate in the lower left corner or elsewhere.
We will review the D-Scanner first followed by the Overview.
D-Scan[edit]
The D-Scanner or D-Scan is an integral part of every ship, including your pod. It's on everything you fly for a good reason. It is an essential tool to look for possible incoming threats and a wide variety of other objects. It can be linked to the active tab on your Overview window, a specific Overview tab preset, an Overview tab preset that you may not use for a tab (more on that later) and return an almost overwhelming list of "what is out there". The distance can be adjusted to as far as 14.3 AU and the directionality can be either a sphere surrounding your ship or a directional narrow cone. Since you will use it frequently, it is convenient to have the scan button mapped to a convenient hot key.
While you cannot scan down cosmic signatures such as wormholes, gas and relic/data sites, it will (with some practice) allow you to determine approximate distance and direction to ships, drones, celestial objects and player-based structures. For explorers that rely heavily on stealth, it helps to protect you by giving you advance warning of nearby (uncloaked) ships. If you are looking to salvage a few abandoned drones or wrecks from a system, it allows you to pre-determine an approximate location so that the time needed to deploy and use combat probes is kept to a minimum.
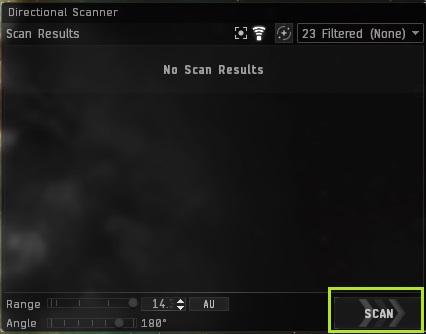
You can filter the findings on the D-Scanner by using the dropdown box in the upper right-hand corner. From this dropdown, you can select any of the EVE default or personal tab presets. It is useful to keep a separate Overview tab preset that shows only probes and ships and link that preset to the D-Scanner. How often you use the D-Scan is your personal preference. In general, the riskier your location, the more frequent you should D-Scan. A ship seen on D-Scan is worth keeping in mind. Is it just passing by in the system going from one place to the other or is it hunting explorers? Why scan for probes? If you see more than the probes that you have launched (or a different type), then someone else is around.
Always be mindful of your surroundings. EVE is not a game that forgives mistakes easily or without cost.
D-Scan Results Window[edit]
Pressing Alt-D will open the D-Scanner "Scan Results" window and the map. If these are separate, the F9 key opens up the map that is used for both probing and D-scanning.
On the bottom right, the Scan button (or your mapped key) will perform the scan. This can be done approximately every 2 seconds. In the scan results window on the upper right side, there is a dropdown list of presets that can be chosen to tell the scanner what to look for. Since D-Scan can be integrated with your overview, you can elect to scan everything, the things that are active in your overview, any other of your overview settings, or even a completely different selection that is not active on your overview.
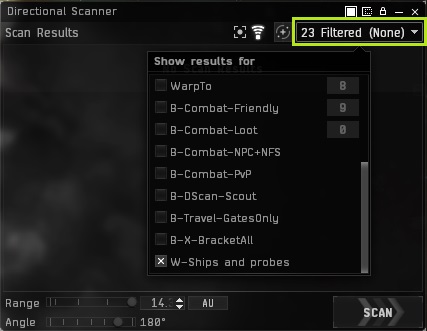
Immediately to the left of the dropdown is a button that will toggle the map on and off. To the left of that is the button that will toggle the sphere or cone showing the area that is being scanned. Finally, to the left of that is the button that controls the ship camera. With one setting, you are looking out of your ship down the length of the cone and the other is more of a third person view that allows you to position the cone of directionality. Double clicking on the map will flip it 90 degrees. Clicking and dragging outside of the map will move your cone of detection. Both settings are useful and the best way to get used to them is to play with them a bit.
At the bottom of the "Scan Results" window, there is a slider that can be used to adjust the range and angle of the cone. The maximum range is 14.3 AU and scans either a sphere surrounding the ship for that distance or a cone ranging from 180 degrees all the way down to a narrow 5 degrees. With a little practice, you can use the combination of the dropdown selection list of objects you are searching for, the distance that you are able to detect them, and the directional cone to identify with a pretty good approximation where an object is located.
On the map in the upper left corner are two buttons. The one on the left allows you to change what your map displays. Immediately to the right of that button, a click will center your ship and the D-Scan view to the center of the map.
-
The D-Scan window and scan button
-
Dropdown select list
-
Toggle Map
-
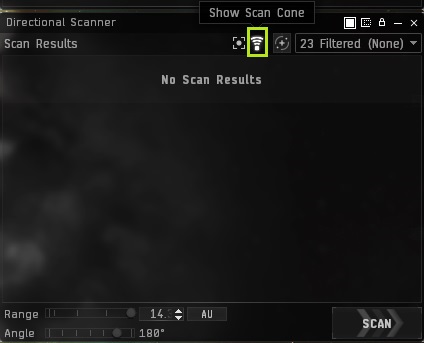
Show/Hide scan cone
-
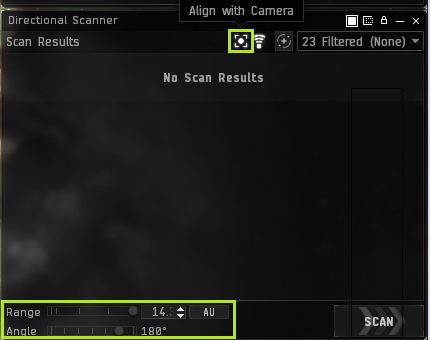
Ship camera toggle with distance and angle sliders
-
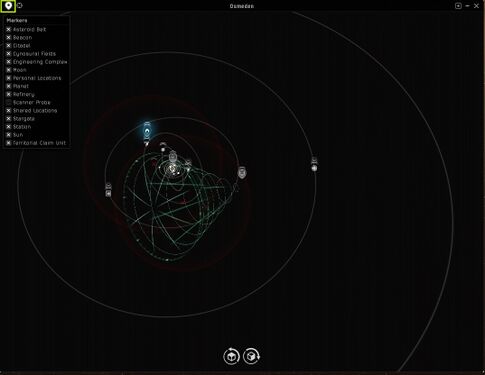
Map item selections
-
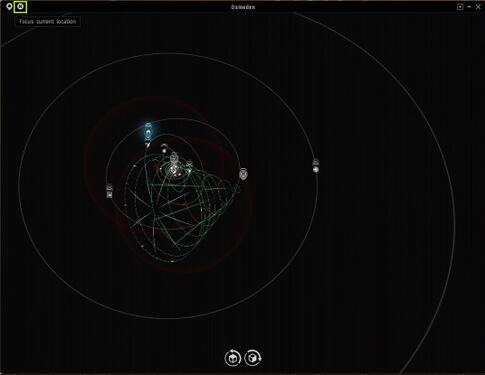
Centering the map on the ship


When first starting, control of the cone and map may seem awkward. It will take some practice with both camera alignment on and off to become comfortable.
For defensive purposes in high or low security areas, setting the distance to 5 AU and the angle to 360 degrees will give you some advance warning of an incoming ship. In null security or wormhole space, you may want to change the distance setting to 14.3 AU for even more advance warning.
Practice Exercises[edit]
Defensive Scanning[edit]
As an explorer, this will likely be the primary use of your D-Scan. You want to be aware of any approaching ships or if someone is using core scanner or combat scanner probes in the area. To view only ships and probes, you will need to create your personal tab preset. In your Overview window, click on the menu (upper left corner - three horizontal lines) and select Open Overview Settings. Clear all selection settings except for Ships (select all of them) and Charge (scanner probe). Save it and name it something like ShipsAndProbes. Now open your D-Scan dropdown and select ShipsAndProbes. Now your D-Scan will show ONLY ships and probes. Pressing the scan button or the keyboard shortcut will let you know if anything is within the range you set. You can re-scan every two seconds. Since you are looking only for ships and probes, you can often see any change in the listing even out of the corner of your eye.
Park your ship between two gates and start using the D-Scan. Watch as ships appear and disappear. Start with 360 degrees and try using different distances in your settings. Experiment with the frequency of scanning and imagine what you might do if you were busy cracking a relic site with lots of valuable containers. Do you abandon it or do you keep on the D-Scan and risk your ship and its contents? Focus on the central part of the screen and see if you can notice the changes in the D-Scanner out of the corner of your eye. If not, you may need to arrange your windows a bit.
Location Scanning[edit]
A bit trickier and will require a bit of practice. Try the following:
- Load an expanded probe launcher and some combat probes. These must be combat probes, not the core scanner probes. You will also need an expanded probe launcher since the combat probes are ten times larger than the core scanner probes.
- If you don't have a selection in your D-Scan dropdown called Drones, then create one as mentioned above in the defensive scanning section. Clear everything and choose the type of drones you want to look for. This can be combat drones or just select all of them. Load Drones from the D-Scan dropdown.
- Go to a system where new players start. It's not uncommon for them to lose drones as they warp away and forget to recall them. Alternatively, grab a drone yourself and take it to someplace in a high security system and leave it behind. Bookmark the location (just in case) so that you can pick it up if you need to. Now warp somewhere in the system and go looking for lost drones or the one that you dropped off.
- Open the map, choose the distance of 14.3 AU and 360 degrees and hit scan. You should see the drone in your sphere of detection.
- Align with the camera and decrease to 180 degrees and scan. If you are not detecting the drone, move the hemisphere of detection and re-scan until you do.
- Decrease to 90 degrees, scan and if needed repeat the process to detect the drone. Keep repeating the process until you are at 30 degrees or less.
- Now stop aligning with the camera and double click on the map. You should see a cone extending from your ship.
- Decrease the distance from 14.3 to 10 and scan again. If you still see the drone, decrease the distance to 5. Once you stop seeing the drone when you scan, you've got an approximate distance. Now use the up and down buttons next to the distance number to fine tune the value where the drone appears/disappears.
- In your probe launcher window, be sure you have Drones and Charges selected.
- Launch your combat probes.
- Center the combat probes over the base of the cone to cover the entire base.
- Scan with your combat probes and you should get a hit. If you need to, reposition your combat probes and scan again until you get a good location.
- Recall your combat probes. The less time they are out, the less chance that someone else will see them.
- Warp to the location and retrieve the drone.
As with everything in EVE (and in real life) practice until you feel comfortable, then practice some more.
The Overview Window[edit]
The overview window updates regularly based on the signature radius of the object. It can be tailored to a pilot's needs and preferences so as to quickly see and use information regarding targeting, getting object information, warping to objects, and more. There are several great descriptions of the overview and configuration. Rather than rewrite all of that information, there are additional links below.
Beginning[edit]
While in space at a safe location, first go to the three horizontal bars in the upper left-hand corner of the Overview window and click on it. You will see a menu appear. You can also access the overview settings by entering in any chat window "/open overview settings".
-
The overview window and the menu location
-
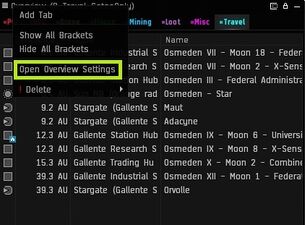
The overview menu and the open overview settings selection
-
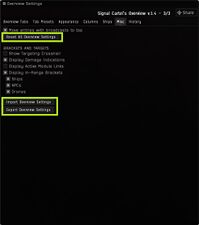
Reset to default, import and export
-
Saving your selections


The first thing to do if you want to explore a different Overview setting is to Export (save) your existing settings. This will allow you to get back to where you were BEFORE you started playing around in case you really mess things up. If you've never made any modifications to the Overview, you can always reset to the EVE defaults. The images above are taken from a modified Barkkor overview pack (see link below).
Resources[edit]
Great resources on using and configuring the Overview can be found at: https://support.eveonline.com/hc/en-us/articles/203273831-Overview-Settings and at https://wiki.eveuniversity.org/Overview_settings
Summary[edit]
Overview Tabs[edit]
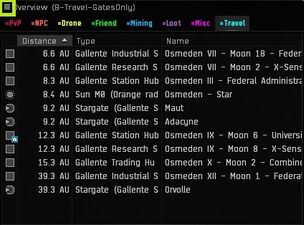
Tabs on the overview allow you to define what you want to display at any time. You can load everything that is visible to your ship onto a tab, or only a few things. The tabs can be configured for PvP, PvE, mining, travelling or pretty much anything you decide you want to do in EVE. Having a few things displayed allows you to quickly see what you need, want to target or what is around your ship. For example, if you are travelling long distances, it is useful to have a tab for travel that shows only the gates and stations or even gates only so that you won't need to scroll to the bottom of the list to find what you want. There are a maximum of 8 tabs that can be configured for the overview. What each tab shows can be changed through the presets.
Tab Presets[edit]
While you can have only 8 tabs visible at a time, you can have many more predefined tab presets to show exactly what you want. The selected preset of each tab can be modified on the fly with a right click. Right clicking a tab brings up a menu that allows you to change the name of the tab or load a default or personal tab preset.
Appearance[edit]
Here you can change color and backgrounds for other pilots in EVE. Note that by clicking and dragging, you can set the priority of what will be shown. The category that is highest on the list takes precedence over those below. For example, if you click and drag "Pilot has Terrible Standing" to the very top, it will display that icon and color for a pilot of terrible standing even if that pilot is in your fleet or in your alliance. At the bottom is a "Reset All" button in case things get hopelessly rearranged.
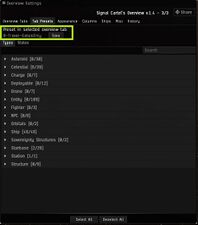
Columns[edit]
Here you can display everything from the name and distance of the listed object to its velocity. Icon, distance, name and type are probably most important. You can literally fill up a screen with this information.
Ships[edit]
This tab lets you configure what you see when you mouse over a ship in space.
Misc[edit]
This tab allows you to reset to the default "Reset All Overview Settings", import those settings that were previously saved, or export your current settings.
The Default Overview Pack[edit]
When you first install EVE, the Overview has the default tab settings of: All, Drones, General, Loot, Mining, PvP, and Warp To. While these are a good start, they really need to be customized to what you do most. Although different tab contents can be loaded with a right click on the tab, you do not want to do this when seconds count. Ideally, you should have displayed what you need and nothing more.
Custom Overview Packs[edit]
There are several overview packs that can be found on the internet. Links to a few are listed below.
The EVE University Overview Page has some links to some common overview packs. Unfortunately, many of them are no longer being updated. That may not pose too much of a problem for exploring, but game updates may add items that show up on the overview ONLY if they are selected as part of the configuration. Whatever overview pack you choose should be updated regularly by either you or its creator.
Signal Cartel Overview Pack by Bernard Lachapelle. This is a custom overview pack tailored towards exploration and created in-house! Check it out!
The Z-S Overview Pack is also popular.
The Barkkor Barkkor overview pack is also useful and has some nice features.
You can find information about an overview generator at https://io.evansosenko.com/eve-overview/. They have several overviews available to try out including overviews for Default, Mission, PvE, PvP and Skirmish. You can find the packs and try these out by joining "Overview Generator" in game channel.
Finally, you can also share your own overview settings with others by opening the Overview Settings window and clicking and dragging "Share" (upper right corner) to your chat window, notepad or an in-game email.
Signal Cartel graciously thanks Oddore Despayre for their foundational contribution to this wiki page that will assist future Signaleers as they explore the stars.