Scanning
Page adopted by Persepheus till 2024-03 
| The Explorer's Handbook |
|---|
Overview[edit]
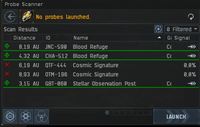
Scanning, one of the main skills of the explorer (together with Hacking and Survival), is the art of turning unknown signatures into known and warp able sites. To be able to scan a site you need a probe launcher and some kind of scanner probes (Figure 1).
What are Cosmic Signatures?[edit]
Cosmic Signatures are unknown sites that show up in your Probe Scanner window as a red "x" surrounded by a transparent red sphere, or dot icon.
Once scanned by your probes, a Cosmic Signature will turn into a known site. There are 4 different types of site that may hide behind the cosmic signature: Wormholes, Data sites, Relic sites or Combat sites.

Anatomy of the Probe Scanner window[edit]
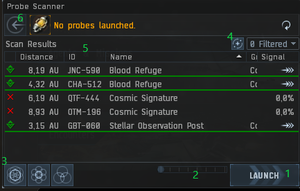
Before we can start scanning we need to know all the important elements of the Probe Scanner window (Figure 2).
- The LAUNCH button. This will launch 8 probes from your ship's probe launcher into space, ready for use. Your probe launcher will auto reload 8 more probes from your cargo if you have them (always carry 2 sets).
- The probe formation size slider. This will make your probes in space retain their formation but control how close/far apart they are.
- Probe formation selection. This will change their formation in space. The far-left option is a sane default if you're unsure.
- Solar System Map button. Once your probes are in space you'll want to hit this button so you can start adjusting them and get to scanning.
- The "ID" column. Each anomaly in space will get its own unique ID (or "sig") so you can tell them apart.
- Probe recovery. Once you've finished scanning you can hit this button and all of your active probes in the current system will instantly return to your ships cargo.

Scanning down Signatures[edit]
To scan a "Cosmic Signature" the first step is to open "Solar System Map" (Figure 2:4) and then launch your probes (Figure 2:1).
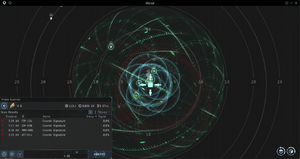
In this Map (Figure 3) you see all signatures as red X and your probes with their scan radius (The light blue circles in the middle of the picture with a box and 4 arrows). If you choose to highlight one signature (clicking it in the probe window) you will get a red bubble around the red x, the true location of the site is somewhere inside that bubble. To determine where it is you need to start scanning by pressing "Analyze" in the probe window (Once your probes are in space the Launch button in Figure 2:1 will change to say Analyze).
Before starting you need to move your probes to the appropriate area of the solar system, depending on the signature you wish to scan. You do this by dragging the "Scan box" to the right place. The scan box moves in three dimensions. You do this by moving the scan box to the center area of the Cosmic Signature, and then flipping the map (there is two icons in the lower right of the "Solar System Map" do flip the map) and adjusting the scan box to the center area of this Cosmic signature (during, and because of, the map flip, the signature will appear to move). It may be easier to control the movement of the "Scan box" if you drag in the arrows (as there are only movement on one axis) but more effective is to highlight a face of the "Scan box" a and move it in 2 axis at the same time. See the section "Techniques" for some tips to scan effectively.

Scan Strength[edit]
Your efficiency in scanning is determined by three factors, all seen at the top of the probe window when you have launched your probes.
The first one is "Scan Strength." A higher scan strength makes it easier and possible to scan down higher levels of signatures. The exact formula used to compute the needed scan strength to scan down a signature is unknown but there are some rules-of-thumb. With 70+ scan strength, most wormholes and combat sites may be scanned down together with most of the exploration sites (even if takes some time). For a dedicated exploration fit, a scan strength of 104+ is needed as that’s the minimum to detect a "Superior Sleeper Cache." Additional scan strength will help you find sites faster, and if you scan more than 200 you may join the Scan Club.
The second factor is "Scan Deviation." It determines how much off your secondary scan is from the true location. A low scan deviation makes it easier to scan due to less need to move the "Scanning Box" and a possibility of fewer scans.
The last factor is "Scan Duration", the time you need to do a scan cycle, a shorter time makes your scanning faster. This is more an issue with combat scanning (as you want to have your probes is space for a short time so your target doesn’t know they have been scanned), but there are situations in regular exploration when a short scan time is valuable. One such situation is during the special events (for example Yoiul event when there is often a competition to find the HS sites).
Techniques[edit]
- "Pan Scan"- Do an untargeted scan in an area with several signatures, with higher scan strength some of them will turn from X to bullets indicating a more precise position.
- "The four AU rule" - Most sites spawn within 4AU from a celestial or gate (there are some exceptions but they are rare) so if you begin your scanning with a 4AU scan, centered on a celestial that is within the bubble of the signature, you have a high chance of getting a good position for the site.
- "Balls and stick" - Sometimes you get a signature that looks like two balls on either end of a stick (or a barbell). The true position is always at the furthest end of the stick from your last scan position (be sure to check in all dimensions before moving your "Scan Box"). This represents how many probes detected the signature. When these balls are the results then only 3 probes detected the signature. Compared to that, a ring only got detected by 2 probes, so the true position is also always further away from the last scan position in this case as well because the closer position would have been detected by more probes.
- "Jump down"- Most of the time you don’t need to scan with every resolution and you can jump two steps every time (4AU - 1AU - .25AU) but the room for error in positioning is less (be sure to zoom in on the signature and place the "Scan box" in the middle of the signature).
- "The last %" - It is possible to get the last few % of signal strength on an anomaly by moving the individual probes closer to each other. You do this by holding "Shift" key and dragging each probe closer to the center of the probe formation. Do this in all 3 dimensions and you will gain the last few % needed to get 100% signal strength and a warpable site.
Bookmarks[edit]
When bookmarking a wormhole make sure you include certain attributes like:
- Where does it lead? C3? C5? HS? etc
- What kind of hole is it? K162? H296? etc
- Does the wormhole seem to move or wobble very quickly? If so it is probably near its "End of Life" and will collapse soon.
- Does the wormhole only support small ships? (If it is a frig hole, for example, ships larger than a Destroyer class wont be allowed through)
- If you press Show Info on the wormhole does it say the hole is "verge of collapse"? This means it has very little mass left and the next ship to go through could cause it to collapse.
Safety while Scanning down Signatures[edit]
As soon you launch your probes everyone within 14.7 AU knows that you’re in system, and as soon you start scanning the range you'll be seen in will increase as your scanner probes moves away from you to another part of the Solar System/Wormhole.
D-Scan[edit]
see also Directional Scanner and Overview
Cloaking[edit]
To be able to launch your probes you need to be uncloaked but as soon as they are launched you are free to cloak again and remain cloaked as you scan. Its recommended that you warp to a Safe spot (or jump between Safes) when you scan. If you are able, use a Covops Cloak so you are able to move under cloak. Otherwise a regular cloak and a safe spot is a good idea.
Safes[edit]

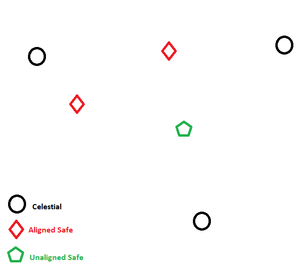
A "Safe" is a spot somewhere in the system that is not easily warpable to (the Sun at 0 or 100km is a bad safe spot). There are two main types of safes; aligned and unaligned. An aligned safe is on a line between two warpable points (often celestials or gates). To create aligned Safes, warp between two objects and drop bookmarks (Shortcut Ctrl+B) along the way. Another player may find you in an aligned Safe by warping between the same objects and using D-scan (if you are not cloaked).
A unaligned Safe is made by warping from an aligned Safe towards a celestial and dropping a bookmark so its not on the line between two warpable objects.
There is another way for explorers to create good Safes in a system. Everytime you scan down a site, bookmark it. Sites spawn randomly in the system and are often unaligned with celestials (but often within 4AU)
Tips and Tricks[edit]
- When jumping into a new wormhole for the first time, you can quickly scan that one down by launching probes, setting your scan probe formation size to 0.5 AU on the slider (Figure 2:2) and then pressing the "Center current formation on your ship" (next to the formation buttons in Figure 2:3) before pressing Analyze.